Subaru Crosstrek Service Manual: Removal
FUEL INJECTION (FUEL SYSTEMS)(H4DO) > Fuel Sub Level Sensor
REMOVAL
WARNING:
Place “NO OPEN FLAMES” signs near the working area.
CAUTION:
• Be careful not to spill fuel.
• Catch the fuel from the tubes using a container or cloth.
• If the fuel gauge indicates that two thirds or more of the fuel is remaining, be sure to drain fuel before starting work to avoid the fuel to spill.
1. Release the fuel pressure. Fuel > PROCEDURE">
2. Drain fuel. Fuel > PROCEDURE">
3. Disconnect the ground cable from battery.
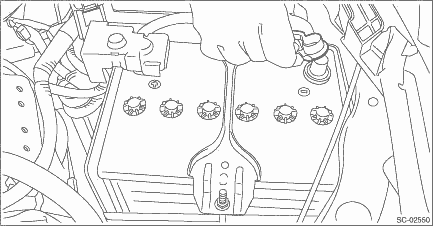
4. Remove the rear seat cushion. Rear Seat > REMOVAL">
5. Remove the service hole cover of fuel sub level sensor.

6. Disconnect connectors from the fuel sub level sensor, and move aside the service hole cover.

7. Disconnect the quick connector of the jet pump tube.
NOTE:
Disconnect the quick connector as shown in the figure.

(a) | Slider |

8. Remove the fuel sub level sensor protector, and remove the rubber cap (A) from nut.

9. Remove the bolts and nuts which hold fuel sub level sensor protector and fuel sub level sensor upper plate to the fuel tank.
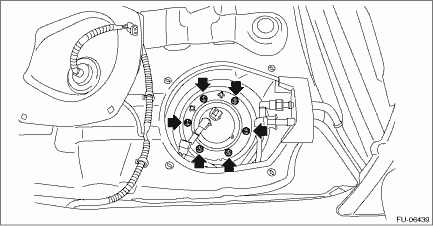
10. Remove the fuel sub level sensor from the fuel tank.
CAUTION:
Be careful not to let the arm and float of the fuel sub level sensor contact the fuel tank.
 Inspection
FUEL INJECTION (FUEL SYSTEMS)(H4DO) > Fuel Sub Level SensorINSPECTION1. Check that the fuel sub level sensor has no damage.2. Measure the fuel sub level sensor float position.(1)FULL(2)EMPTY(3)Datu ...
 Installation
FUEL INJECTION (FUEL SYSTEMS)(H4DO) > Fuel Sub Level SensorINSTALLATION1. Install the fuel sub level sensor to the fuel tank.(1) Make sure the sealing portion is free from fuel or foreign matter be ...
Other materials:
Engine cooling system trouble in general Inspection
COOLING(H4DO) > Engine Cooling System Trouble in GeneralINSPECTIONTroublePossible causeCorrective actionOver-heatinga. Insufficient engine coolantReplenish engine coolant, inspect for leakage, and repair it if necessary.b. Defective thermostatReplace.c. Malfunction of water pumpReplace.d. Clogged ...
Component
COMMUNICATION SYSTEM > General DescriptionCOMPONENT(1)Horn switch (driver’s airbag module ASSY)(3)Horn relay(5)Horn ASSY - Hi(2)Roll connector(4)Horn ASSY - Lo ...
Dtc p2402 evap system leak detection pump control circuit high
ENGINE (DIAGNOSTICS)(H4DO) > Diagnostic Procedure with Diagnostic Trouble Code (DTC)DTC P2402 EVAP SYSTEM LEAK DETECTION PUMP CONTROL CIRCUIT HIGHDTC detecting condition:Immediately at fault recognitionCAUTION:After servicing or replacing faulty parts, perform Clear Memory Mode Clear Memory Mode ...