Subaru Crosstrek Service Manual: Installation
EXHAUST(H4DO) > Front Exhaust Pipe
INSTALLATION
1. Set the front exhaust pip and center exhaust pipe to the vehicle, and temporally tighten the nuts which secure the front exhaust pipe to cylinder head.
NOTE:
Use a new gasket.

2. Install the bolts, springs, and nuts which secure the rear exhaust pipe to the center exhaust pipe.
NOTE:
Use a new gasket.
Tightening torque:
18 N·m (1.8 kgf-m, 13.3 ft-lb)
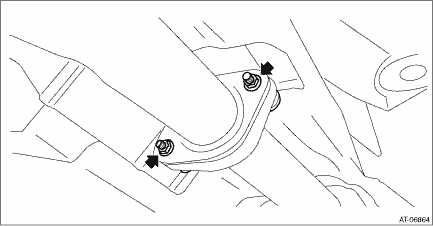
3. Tighten the bolts which secure the center exhaust pipe to the hanger bracket.
Tightening torque:
35 N·m (3.6 kgf-m, 25.8 ft-lb)

4. Tighten the nuts which hold front exhaust pipe to cylinder heads.
Tightening torque:
30 N·m (3.1 kgf-m, 22.1 ft-lb)
5. Connect the front oxygen (A/F) sensor connector (A) and rear oxygen sensor connector (B), and fasten the harness with the clip (C).

6. Install the under cover. Front Under Cover > INSTALLATION">
7. Lower the vehicle.
8. Connect the battery ground terminal. NOTE">
 Inspection
EXHAUST(H4DO) > Front Exhaust PipeINSPECTION1. Check the connections and welded parts for exhaust leaks.2. Make sure there are no holes or rusting. ...

Other materials:
Using the phone switch/microphone
Steering switch
By pressing the steering switch, a call can
be received or ended without taking your
hands off the steering wheel.
Volume control switch
Off hook switch
On hook switch
Microphone
The microphone is used when talking on
the phone.
Type A
Type B
How ...
Inspection
GLASS/WINDOWS/MIRRORS > Front Regulator and Motor AssemblyINSPECTION1. Disconnect the connector of the motor - front.2. Check the motor operation when battery voltage is applied between terminals of the motor - front connector.• LH sideTerminal No.Inspection conditionsStandard4 (+) — 1 (& ...
Removal
GLASS/WINDOWS/MIRRORS > Rear Regulator and Motor AssemblyREMOVAL1. Disconnect the ground cable from battery. NOTE">2. Remove the trim panel - rear door. Door Trim > REMOVAL">3. Remove the sealing cover - rear door. Rear Sealing Cover > REMOVAL">4. Remove the glass ...
